The Story behind Scratch Dig
There seems to be a wide variation in the reporting of surface quality on sapphire windows and lenses, as well as what is and what isn’t possible. 20/10 or better optical surfaces on sapphire windows is thought to be impossible by some. The extreme hardness of the material does lend itself to difficulties in polishing. However, the parameters of scratch and dig by MIL-PRF-13830 does lay out what can be labeled as 80/50 as opposed to 20/10.
The Nitty Gritty – Lets start with the dig measurement, as it is more easily definable. The dig number is the number mentioned second in the scratch/dig combo. For example, 50 would be the dig specification in 80/50. MIL spec. states that dig numbers are the actual diameters of defects allowed, specified in units of 1/100mm. So the 50 dig would translate to a dig measuring 50/100 of a millimeter in diameter, or 1/2 a millimeter. But, this doesn’t mean that each surface can be covered with unlimited digs that measure underneath the allowable diameter. The standard continues to explain how the amount of maximum size digs can only be one per each 20mm of diameter. Furthermore, the sum of the diameters of all the digs shall not exceed twice the diameter of the maximum size specified per 20mm diameter. In other words, all the dig diameters in a 10mm radius must be less than or equal to twice the specified dig number. Using the same “50” measurement, that would mean less than or equal to 1mm of totaled dig diameters within that 10mm radius. On surface qualities spec’d at dig measurement 10 or lower, all digs must be separated edge to edge by at least 1mm.

When ordering optical components from Guild Optical Associates, you can be certain that you will receive a surface quality equal to or better than what you specified.
Scratches are where the variables are often found. There is a set of optics demonstrating the limit standards for scratches at the Picatinny Arsenal in New Jersey. These pieces are in pairs to demonstrate the upper and lower limit visibility for scratches in each statistical category. According to David Aikens, there were a number of revisions to the way the scratches would be measured, but not to the visual limit standards in Picatinny, nor the MIL spec itself. The modifications were written in to drawing C7641866. Revision H specified that the scratch number would be the width of the scratch in microns. Revision J went even more overboard, stating that the scratch number would be the width of the scratch in tenths of microns. Finally Revision L put a rest to this and labeled the aforementioned revisions as reference only.
In all actuality, the scratch measurement has not changed at all. It is still a measurement that is checked objectionably by a visual inspection. The standards at Picatinny are the reference points, but not everyone has a set of these, or a replica. A scratch/dig visual inspection is a completely valid and acceptable way of measuring the surface quality of optics. Each company has a person or set of people that verify their manufactured optics to your chosen scratch/dig specification. The specification numbers with the vendor that works best for your intended use are essentially what you order.
But don’t let your sapphire vendor tell you that sapphire windows without visual scratches, digs, and sleeks are impossible, because that is simply not true. At Guild Optical Associates, we have an educated staff that understands the MIL spec standards for scratch/dig surface quality. It takes a well trained eye and proprietary techniques perfected over 24 years to offer sapphire optics true to the limit standards. We are capable of polishing sapphire windows to 10/5 surface qualities. To insure that we meet those standards, Guild Optics often quotes their surface qualities as nominal or better, for example, 60/40 or better.
There may be a noticeable difference in surface quality from vendor to vendor. Guild Optical Associates aims to place that difference in our customer’s favor.
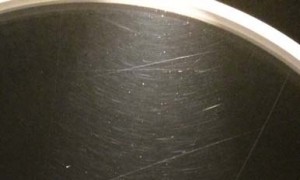
 Above is a photo of a sapphire window that one of our competitors deemed fit as meeting 40/20 scratch/dig specifications. Because surface quality is a visual inspection, it is subjective to the visual interpretation of who is inspecting it. Of course there are a set of standards that optical manufacturers are supposed to base the specification from, and we do not feel this necessarily is a good interpretation of the standard.
 The photo above is one of our polished sapphire windows that we feel meets the 40/20 scratch/dig specification. These windows are polished right here at Guild Optical Associates in Amherst, NH. As you can see there is a noticeable difference between our interpretation of the scratch dig standard and the competition’s interpretation. Give Guild Optics a try on your next sapphire window or lens order and see the difference for yourself.

